Thursday, December 4, 2008
Mounting an external drive using volume label
First of all, find out the correct device partitions for usb drives.
$ sudo fdisk -l
Disk /dev/sda: 250.0 GB, 250059350016 bytes
255 heads, 63 sectors/track, 30401 cylinders
Units = cylinders of 16065 * 512 = 8225280 bytes
Disk identifier: 0x4be002e1
Device Boot Start End Blocks Id System
/dev/sda1 1 1402 11261533+ 12 Compaq diagnostics
/dev/sda2 * 1403 15918 116592640 6 FAT16
/dev/sda3 15918 29975 112918572 f W95 Ext'd (LBA)
/dev/sda4 29976 30402 3420160 12 Compaq diagnostics
/dev/sda5 15918 22292 51200000 7 HPFS/NTFS
/dev/sda6 22293 22304 96358+ 83 Linux
/dev/sda7 22305 22912 4883728+ 82 Linux swap / Solaris
/dev/sda8 22913 26559 29294496 83 Linux
/dev/sda9 26560 29975 27438988+ 83 Linux
Disk /dev/sdb: 320.0 GB, 320072933376 bytes
255 heads, 63 sectors/track, 38913 cylinders
Units = cylinders of 16065 * 512 = 8225280 bytes
Disk identifier: 0x5b6ac646
Device Boot Start End Blocks Id System
/dev/sdb1 1 24315 195310206 c W95 FAT32 (LBA)
/dev/sdb2 24316 38913 117258435 82 Linux swap / Solaris
The Usb disk is mounted at /dev/sdb.
Before changing the label, unmount the device partitions. This is very important.
$ sudo umount /dev/sdb1
$ sudo umount /dev/sdb2
Install "mtools" and "e2fsprogs"
$ sudo apt-get install mtools e2fsprogs
in order to label vfat partitions, we need 'mtools' and 'e2label' is needed for labelling ext2/3 partitions.
$ sudo mlabel -i /dev/sdb1 -s :: SWG_WIN
now check the label with following command
$ sudo mlabel -i /dev/sdb1
Volume label is SWG_WIN
$ sudo e2label /dev/sdb2 swg_lin
check the label using following command:
$ sudo e2label /dev/sdb2
swg_lin
Now edit /etc/fstab and enter following lines:
LABEL=SWG_WIN /mnt/usb_win vfat user,rw,auto,umask=0 0 0
LABEL=swg_lin /mnt/usb_linux ext3 user,rw,auto 0 0
save the file and remount them
$ sudo mount -a
More information about changing partition labels are given here.
Sunday, November 30, 2008
Drawing Rectangles in GIMP
http://pbs01.wordpress.com/2007/09/30/145/
Saturday, November 22, 2008
Setting UP NFS server/client on Ubuntu
This is mostly a local copy of the instructions available at this link. I have tried this howto and it works perfectly for me.
at the terminal type
sudo apt-get install nfs-kernel-server nfs-common portmap
When configuring portmap do =not= bind loopback. If you do you can either edit /etc/default/portmap by hand or run:
sudo dpkg-reconfigure portmap
sudo /etc/init.d/portmap restart
Editing /etc/exports
the /etc/exports file is used for creating a share on the NFS server
invoke your favorite text editor or
sudo vi /etc/exports
Here are some quick examples of what you could add to your /etc/exports
For Full Read Write Permissions allowing any computer from 192.168.1.1 through 192.168.1.255
- /files 192.168.1.1/24(rw,no_root_squash,async)
Or for Read Only from a single machine
- /files 192.168.1.2 (ro,async)
sudo /etc/init.d/nfs-kernel-server restart
Also aftter making changes to /etc/exports in a terminal you must type
sudo exportfs -a
Install NFS client support
sudo apt-get install portmap nfs-common
Mounting manually
Example to mount server.mydomain.com:/files to /files. In this example server.mydomain.com is the name of the server containing the nfs share, and files is the name of the share on the nfs server
The mount point /files must first exist on the client machine.
cd /
sudo mkdir files
to mount the share from a terminal type
sudo mount server.mydomain.com:/files /files
Note you may need to restart above services:
sudo /etc/init.d/portmap restart
sudo /etc/init.d/nfs-common restart
Mounting at boot using /etc/fstab
Invoke the text editor using your favorite editor, or
gksudo gedit /etc/fstab
In this example my /etc/fstab was like this:
- server.mydomain.com:/files /files nfs rsize=8192,wsize=8192,timeo=14,intr
It is a good idea to test this before a reboot in case a mistake was made.
type
mount /files
in a terminal, and the mount point /files will be mounted from the server.
Gtalk Voice chat on Ubuntu
Presently Empathy supports voice calls through gtalk. The installation instructions are available here. Just for convenience, I am reproducing the set of instructions necessary to get you started with it. Visit the above site for user comments and more information if things don't work out for you.
Use Synaptic package manager, go to Settings->Repositories->Third Party Software and then click Add and add the following line
deb http://ppa.launchpad.net/telepathy/ubuntu hardy main
Then, Install the following packages using Synaptic Pagakage manager.
- Empathy
- telepathy-gabble
- telepathy-mission-control
- telepathy-stream-engine
After successful installation, open the Empathy application and use the menu, Edit->Accouts to add your gtalk account. Enjoy using voice chat with your favorite gtalk account using Empathy in Linux.
Tuesday, October 7, 2008
Data Backup and File synchronization
In short, file synchronization and backing up data is no more daunting on Linux.
Friday, October 3, 2008
Ubuntu - Most popular Linux
You won't belive, I was just overwhelmed at its first performance. All of my hardwares got working during the first install itself ... installing flash, media players, java plugin was as simpler than writing this blog itself ... Suddenly my system looked all new and fresh ... I thought speed would be less, but I was wrong again ... It was amazingly fast ...
No wonder why Ubuntu is No. 1 Linux distro. You must give it a try ...
Some later additions:
- Until now I preferred command line interfaces (CLI) for configuring applications like network setting, installing/uninstalling softwares, browsing and even cd writing. Its because I relied less on gui system. However after moving to Ubuntu, I started using much of gui stuff.
- Secondly, the ubuntu forums are very good in the sense that I could get rid of most of my problems in a very short time.
- Barring few glitches here and there, I found Ubuntu quite user friendly and easy to use.
Friday, September 26, 2008
APT - Pinning in Debian
More information on APT - Pinning
Could not start kstartupconfig on Debian Etch 4.0
$ apt-get install kdm kde-core
However when I log out and login again by choosing KDE as my window manager, I get following error:
could not start kstartupconfig. Check your installation.
One solution that worked for me is this:
$ sudo chown -R username:users /home/username
'username' is the login name for the current user. After that I logged out and logged in again to get a working KDE session.
Monday, September 22, 2008
Resizing image using GIMP
Print size = No. of Pixels / Resolution
So, for different resolution, we need to choose different of pixels so that the size remains same. The formula would be
NoP_1 / Res_1 = NoP_2 / Res_2
So, the new number of pixels for new resolution would be given by
NoP_2 = Res_2 * NoP_1 / Res_1
Load a new image onto GIMP from File -> Open menu and then go to view -> Info Window to know about current size and resolution. Now go to button Image -> Scale Image window and reduce the x and y resolution to a lower value and compute the x size and y size (in pixels) for this new resolution using above formula and change them accordingly. Then save the file in your desired format.
Thursday, September 11, 2008
Editing PDF on Linux
1. PDFedit. The only full-fledged pdf editor available for linux. However, it has many caveats and I hope new releases of this software solve the problems. One of the problems that it does not edit many files saying the document is "read-only". Even though I set the option "allow editing read-only files" in Tools->option, still it does not work. Secondly, pdfedit freezes for few seconds during highlighting text.
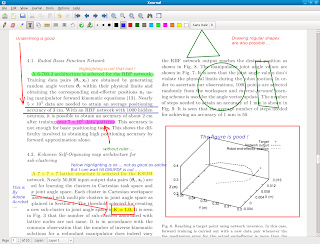
2. Xournal. It seems to be a better option for highlighting and annotating PDF files. This page talks about configuring xournal for highlighting function. The interface is smooth and things seem to work for the time being. I would post more on this when I try them out.
Some other tools for editing PDF files on Linux are as follows:
Now that I tried xournal, I must say its pretty good. At least it is not that buggy as compared to PDFedit. But PDFedit has more features and we can expect to get good behaviour in future releases. But as far as highlight and annotating is concerned, I am happy with xournal. Just see a snapshot of xournal window.
Saturday, August 16, 2008
Printing on a HP LaserJet over the network using Linux
Lets first see the system configuration.
$ uname -a
Linux localhost.localdomain 2.6.25.14-108.fc9.x86_64 #1 SMP Mon Aug 4 13:46:35 EDT 2008 x86_64 x86_64 x86_64 GNU/Linux
So, basically I am using FC9 with x86_64 processor. This much is good enough for us.
Check if cups daemon is running. You can check at System->Administration->Services->Cups. It should be running. You can also check this on console using following command:
$ sudo /sbin/chkconfig --list|grep cups
cups 0:off 1:off 2:on 3:on 4:on 5:on 6:off
So, Cups is running on run-level 3, 4 and 5. If it is not running, then you should make it run first. Its not dificult and following command should do the job.
$ sudo /sbin/service cups start
or
$ sudo /sbin/chkconfig --level 345 cups on
Now, check if hplip is available on your system.
$ rpm -qa|grep hplip
hplip-2.8.2-2.fc9.x86_64
hplip-gui-2.8.2-2.fc9.x86_64
In case they are not present, use Yum to get the required packages:
$ sudo yum install hplip hplip-gui
If HPLIP is already installed then try running hp-setup to configure your printer.
$ sudo hp-setup
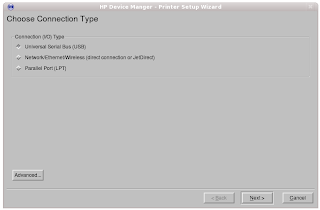
I choose the second option 'Network connection'. Then click on next.
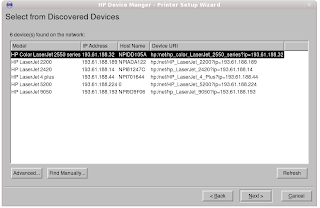
It lists the printers available on the network. I choose the the HP LaserJet 2200 that is assigned to me and then click next.
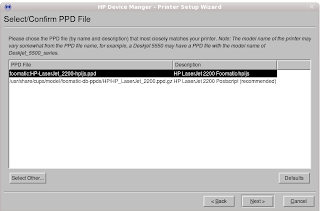
It asks me to select a suitable PPD file available in the list. Usually you should select the one that closely matches the description of the printer. In this case I retain the first selection.
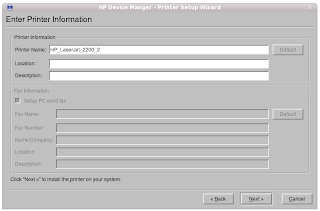
Here I add some description to my printer and click next. On the next screen it sends a test page for printer. It starts working !! I did not believe that the things would be this much simple. Because I remember spending days on getting my printer work on linux. I think those days are gone now. The life has certainly become more comfortable with linux.
Sunday, July 6, 2008
Remote Access on Linux
Rather than explaining things, I would just write down few commands to get you started. I am assuming you are using Debian Etch 4.0.
$ sudo apt-get install vncserver
$ vncserver :1 -geometry 1024x768 -depth 24 -pixelformat rgb565

It might ask you to enter a password to be used by users to connect your system through vnc.
The first time vncserver is started up, it will also create a configuration file, in your home directory, called $HOME/.vnc/xstartup. Execute the follow to stop vncserver.
$ vncserver -kill :1
On your client,
$ vncviewer :1
Best part is you can connect to a vncserver through an SSH tunnel using -via option with vncviewer. But install tightvncserver on the host machine. In order to use ssh tunnel, you need to provide username and password for ssh login. so the first password is for ssh login while the second password is for vncserver available in ~/.vnc/passwd. -Fullcolor option gives best display property for your vnc session.
[control@cube:]$ vncviewer -via swg@172.28.52.111 -Fullcolor insane:1
VNC Viewer Free Edition 4.1.1 for X - built Feb 26 2007 20:38:07
Copyright (C) 2002-2005 RealVNC Ltd.
See http://www.realvnc.com for information on VNC.
swg@172.28.52.111's password: ***
Sun Apr 27 12:24:43 2008
CConn: connected to host localhost port 5599
CConnection: Server supports RFB protocol version 3.3
CConnection: Using RFB protocol version 3.3
Password: ***
Sun Apr 27 12:24:45 2008
TXImage: Using default colormap and visual, TrueColor, depth 24.
CConn: Using pixel format depth 24 (32bpp) little-endian rgb888
CConn: Using ZRLE encoding
Sun Apr 27 12:24:52 2008
CConn: Throughput 20000 kbit/s - changing to hextile encoding
CConn: Using hextile encoding
Connecting a Linux server from a windows client
1. Using Putty to establish a ssh connection and exporting display using xmanager
2. Using VNC client to connect to vnc server running on linux machine.
I would describe both the methods as neatly as possible.
Putty+ Xmanager
1. Download "Xmanager" from this site.
http://www.netsarang.com
2. Install the Xmanager Enterprise 2.1 Build 0038 . In the serial
field type "evaluation".
3. Once installation is over, go to start -> all programs -> Xmanager
Enterprise -> xmanager-passive
4. Now run "putty.exe". Enter the IP of the ssh server you want to
connect. Click on connection -> ssh -> x11 on the left hand side bar
and on the right hand side click on "Enable X11 forwarding".
5. Now login to your ssh server and run any gui application.
VNC Server - client
1. Download realvnc viewer from this site. It would ask you to enter
user info. Don't enter anything and click on "proceed to download".
http://www.realvnc.com/products/free/4.1/winvncviewer.html
2. Download the following exe file and NOT the zipped one and put it on desktop.
VNC Free Edition Viewer for Windows
Stand-alone Viewer
Version 4.1.2
3. Double click on it. It would ask for Server. Enter following
your_vnc_server:1
4. Then it will ask for password only. Now enter the password provided to you.
5. Enter the password and you can the linux desktop.
Caution: First try to connect the vncserver from a linux desktop and make sure that it is working. Then only try from a windows machine.
Thursday, June 5, 2008
Renaming multiple files on Linux
The syntax for the rename command is:
rename [ -v ] [ -n ] [ -f ] perlexpr [ files ]
-v : verbose
-n : test run
perlexpr: perl regular expression
Example 1: change "*.htm" to "*.html"$ rename -n ’s/\.htm$/\.html/’ *.htm
s - substitute : s/old/new
$ - end of string. That is search for only '.htm', not '.html'
Example 2: change filenames that have the pattern ########.JPG (8 numbers and capital .JPG) to something like BeachPics_########.jpg
$ rename -n 's/(\d{8})\.JPG$/BeachPics_$1\.jpg/' *.JPG
00001111.JPG renamed as BeachPics_00001111.jpg
00001112.JPG renamed as BeachPics_00001112.jpg
00001113.JPG renamed as BeachPics_00001113.jpg
\d{8} : count 8 digits
(\d{8}) : Parenthesis is meant to save this as an argument for later use
$1 : insert the string from the first set of parenthesis - in this case the 8 digits
$ rename -n 's/\d{5}(\d{3})\.JPG$/BeachPics_$1\.jpg/' *.JPG
00000123.JPG renamed as BeachPics_123.jpg
00000124.JPG renamed as BeachPics_124.jpg
00000125.JPG renamed as BeachPics_125.jpg

Example 3: replace 'weight_' to 'ffn_wt_' in all the files

$ rename -n 's/weight_*/ffn_wt_/g' *.txt
weight_far.txt renamed as ffn_wt_far.txt
weight_near.txt renamed as ffn_wt_near.txt
weight_top.txt renamed as ffn_wt_top.txt
Wednesday, May 28, 2008
Bash History
In this article I would take about Bash history commands and how to efficiently use them. I won't do much apart from providing some good links in this regard:
Summary of some commands:
- Bash History
- !! - repeat last command
- !foo - repeat last command starting with 'foo'
- CTRL + R - command auto completion
- history - prints a numbered list of previously typed commands
- !N - executes Nth command in the history list
- !foo:p - prints a command without executing it
- !$ - last argument (word) of the previous command
- !* - all arguments of previous commands
- ^error^correction - re-executes previous command by replacing 'error' with 'correction'
- Home / END
- CTRL + a - beginning of a line
- CTRL + e - End of a line
- CTRL + w - erase a word
- CTRL + u - erase from here to the beginning of the line
- Modifying History behaviour
$ export HISTFILESIZE=500
$ export HISTIGNORE="&:[ ]*:exit"
            This ignores repeated commands, commands that start with a space and 'exit' and they are not added to bash history

$ shopt -s histappend
$ shopt -s histverify
            allows users to verify a substituted history expansion.

$ shopt -s histreedit
            allows users to re-edit a failed history substitution

Put these lines into .bashrc file so that you won't have to type them again and again
Tuesday, March 11, 2008
Tryst with Xmgrace
Typesetting
Grace permits quite complex typesetting on a per string basis. Any string displayed (titles, legends, tick marks,...) may contain special control codes to display subscripts, change fonts within the string etc.
Example:
F\sX\N(\xe\f{}) = sin(\xe\f{})\#{b7}e\S-X\N\#{b7
prints roughly
F (e) = sin(e)·e ·cos(e)
x
using string's initial font and e prints as epsilon from the Symbol font.
NOTE: Characters from the upper half of the char table can be entered directly from the keyboard, using appropriate xmodmap(1) settings, or with the help of the font tool ("Window/Font tool").
Control code | Description |
| \f{x} | switch to font named "x", e.g. \f{Times} |
| \f{n} | switch to font number n |
| \f{} | return to original font |
| \R{x} | switch to color named "x" |
| \R{n} | switch to color number n |
| \R{} | return to original color |
| \#{x} | treat "x" (must be of even length) as list of hexadecimal char codes |
| \t{xx xy yx yy} | apply transformation matrix |
| \t{} | reset transformation matrix |
| \z{x} | zoom x times |
| \z{} | return to original zoom |
| \r{x} | rotate by x degrees |
| \l{x} | slant by factor x |
| \v{x} | shift vertically by x |
| \v{} | return to unshifted baseline |
| \V{x} | shift baseline by x |
| \V{} | reset baseline |
| \h{x} | horizontal shift by x |
| \n | new line |
| \u | begin underline |
| \U | stop underline |
| \o | begin overline |
| \O | stop overline |
| \Fk | enable kerning |
| \FK | disable kerning |
| \Fl | enable ligatures |
| \FL | disable ligatures |
| \m{n} | mark current position as n |
| \M{n} | return to saved position n |
| \dl | LtoR substring direction |
| \dr | RtoL substring direction |
| \dL | LtoR text advancing |
| \dR | RtoL text advancing |
| \x | switch to Symbol font (same as \f{Symbol}) |
| \+ | increase size (same as \z{1.19} ; 1.19 = sqrt(sqrt(2))) |
| \- | decrease size (same as \z{0.84} ; 0.84 = 1/sqrt(sqrt(2))) |
| \s | begin subscripting (same as \v{-0.4}\z{0.71}) |
| \S | begin superscripting (same as \v{0.6}\z{0.71}) |
| \T{xx xy yx yy} | same as \t{}\t{xx xy yx yy} |
| \Z{x} | absolute zoom x times (same as \z{}\z{x}) |
| \q | make font oblique (same as \l{0.25}) |
| \Q | undo oblique (same as \l{-0.25}) |
| \N | return to normal style (same as \v{}\t{}) |
| \\ | print \ |
| \n | switch to font number n (0-9) (deprecated) |
| \c | begin using upper 128 characters of set (deprecated) |
| \C | stop using upper 128 characters of set (deprecated) |
Putting Symbols into Axis labels:
If you need special characters or special formatting in your label, you can use grace escape sequences (the sequence will appear verbatim in the text field but will be rendered on the graph), see typesetting above. If you don't remember the mapping between alphabetic characters and the glyph you need in some specific fonts (mainly symbol and zapfdingbats), you can invoke the font tool from the text field by hitting CTRL-e. You can change fonts and select characters from there, they will be copied back in the text field when you press the "Accept" button. Beware of the position of the cursor as you enter text or change font in the font tool, the character or command will be inserted at this position, not at the end of the string!
Note that you should see \f{Symbol} in the Cstring field of font tool when you select a symbol. In case you don't, write down manually and then click on a symbol you wish to insert and then press 'Accept'.
overlaying graphs
- Begin by selecting Main:Edit/Overlay graphs to bring up the Overlay widget.
- Select the graph numbers with which we would like to deal. In this example, we will overlay graph 1 onto graph 0. At this point, only graph 0 is visible. We cannot see Graph 1 to select since it does not exist at this point. We need to create simply by pressing mouse button 3 in a graph list window and selecting create new.
- The overlay type is determined by what is common among the overlayed graphs. In our example, the x axis is common so we will select X-axes same, Y-axes different. This is important because we don't want to alter any axes of the Overlay graph which we set the same as the underlay graph. In this example, we don't want to alter the x-axis of graph 1.
- We are now ready to label the graph axes and read the data. One thing we must be careful to do is to always make sure that we are working on the intended graph. Seeing as the graphs are overlain, clicking within the frame is ambiguous as to what graph is selected. The rule is that in a region of overlay, clicking will cycle between the graphs. Hence, if graph 1 is selecting, clicking within the frame will toggle to graph 0.
- Making sure that graph 0 is active, bring up the Axis properties widget. Now set the y axis title to Gnus.
- Select graph 1 as active as set the title as Gnats. Notice how it overlaps the Gnus. We want to put this on the right side. From the axis label and bar tab, select label Properties/Side=Opposite.
- Label the x axis to label it. If graph 1 is the current graph, noticed how it is greyed out because only 1 x axis need be active. Select graph 0 and you should now be able to alter the axis label.
- You are ready to read in data. Just make sure the graph that is active when you read in the data (or create your set) is the one in which you intend it to go.
Saturday, March 8, 2008
Installing Matlab 7 on Fedora 7
Problem 1: The installer does not work.
http://www.mathworks.com/support/solutions/data/1-12E9FJ.html?solution=1-12E9FJ
libXp.so.6: cannot open shared object file: No such file or directory
You need to install "libXp-devel" package.
# yum install libXp-devel
Problem 2: Why does MATLAB fail to launch on Linux machines with an error about Assertion `c->xlib.lock' failed
http://www.mathworks.com/support/solutions/data/1-54UIFE.html?solution=1-54UIFE
Problem 3: When launching matlab, you may get following error
error while loading shared libraries: /usr/local/matlab73/bin/glnx86/libmwlapack.so: cannot restore segment prot after reloc: Permission denied
There are two solutions - first, you disable SELINUX. The other solution is to allow the permission in SELinux administration itself.Open the
SELinux Administration GUI and set the following Memory Protection Boolean to true.Allow all unconfirmed executables to use libraries
requiring text relocation that are not labeled texttrel_shlib_t.or run following command on console
# chcon -t texrel_shlib_t /usr/local/matlab2006b/bin/glnx86/*.so
Saturday, March 1, 2008
Microphone not working on Debian Etch
If you are using gnome, then open "gnome-volume-control".
$ gnome-volume-control &
Edit -> preference -> click on 'microphone' and 'capture'. Now make sure the microphone and capture switches are un-muted. Don't close this window and open gnome-sound-recorder.
$ gnome-sound-recorder &
Click on the record button and say something on the mic. You should be able to hear your voice once you play the recorded file. If everything goes well, then save the settings.
$ sudo alsactl store
Friday, February 29, 2008
Voice Chat on Linux
I tried my hands at Kopete, pidgin, ekiga, jabbin, gaim, psi etc. without much success. While text messaging is supported, I failed to configure voice chat on it. I know that voice chat is supported on skype. However, I don't want to create another account for it. Moreover I am google fan and won't like to switch over to skype so soon. I would keep updating this thread about the improvements I made in this regard.


